
The Crimson Fists are a popular chapter for space marines...and rightly so! They were on the original artwork for Rogue Trader back in the day and have one of the best back stories, with them being almost wiped out in recent history (galactically speaking) during the battle for Rynn's World.
 |
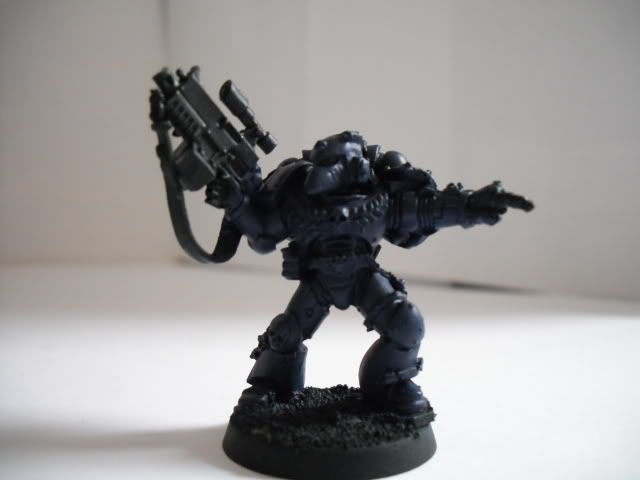
| Finished Assault Squad |
When I was a wargaming and roleplaying teenager I liked them and at the age of 34 I still like them. So much so that this year i started to collect space marines to build an army. I stumbled, purely by accident, on a decent looking and easy painting method and I thought now that we have started the blog its a good time to see if anybody else wants to use it. I'm not saying its a professional paint job but definitely look good for the amount of effort that goes in. This method requires alot of drybrushing, something I don't usually use much off when painting.
I've posted various stages of painting pictures throughout and theres more finished models across the blog. I'd also highly recommend buying the GW shoulderpads, they look much better than the transfers supplied with the models and leave no room for error. So here goes
Wash the sprue in warm soapy water and allow to dry, cut the models from the sprue and trim off any lines. Glue the models together (including shoulderpads) but leave the boltguns off for now. Usually i cut the handle off of one boltgun and use this to pose the models arms properly. Now glue some sand onto the base with PVA before we start the painting.
Painting
Painting
Start off by spraying the models with a black undercoat.
The Blue
 |
| Necron Abyss Basecoat |
Get a fairly decent sized brush and give the model a fairly heavy drybrushing (or wetbrushing) with Regal Blue.
Wash the brush and use the same one to drybrush the model with Ultramarines Blue, making sure not to be as heavy with the previous layer.
Now get a smaller brush you can also use for drybrushing. Give the model a light drybrush of Ice Blue, mainly concentrating on edges and large areas, such as kneepads, shoulderpads etc. Don't be afraid at this point if the model gets too much Ice Blue on it, we can deal with that in the next stage.
Now wash the model liberally with Asurmen Blue, making sure it gets in all the nooks and crannies. If you put too heavy a drybrush of Ice Blue in the previous stage then wait for the wash to dry and give the model a second coat. You will find that the wash blends all the blue layers in nicely and the different layers of blue will give a nice rich colour to the model.
Now its important before the next stage to ensure that ALL of the Asurmen Blue wash has dried, otherwise its going to get messy.
Once its dry give the model a light drybrush, almost a dusting, with Ice Blue. Do this along the edges to bring them out nicely and aslo across large rounded areas like shoulderpads and kneepads. If you put on too much don't panic, simply repeat the blue wash in the areas needed.
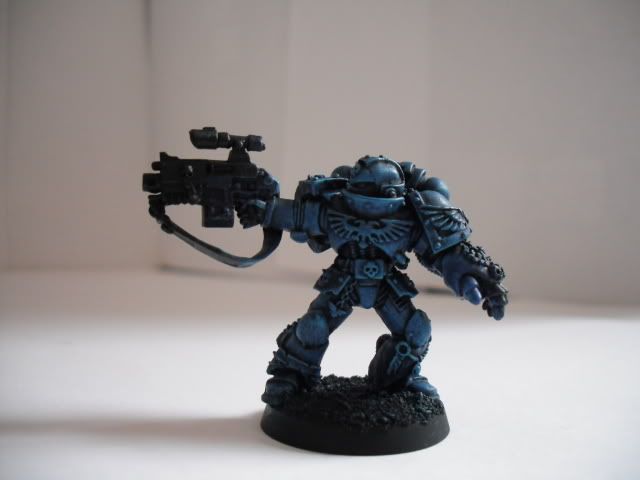 |
| The blue stage finished |
Start with a basecoat of Mechrite Red. paint over this with Scab Red and then Red Gore to give a nice rich red colour. Paint the raised areas, such as fingers, with Blood Red and then wash with Baal Red. When this is dry give it another lighter coat of Blood Red across knuckles/fingers etc to bring out the raised areas. This should leave you with a nicely shaded red fist that stands out quite brightly, this looks especially good on powerfists. For red cloaks I tend to give a few layers of Blood Red and then Baal Red wash, with Blood Red being the final layer.
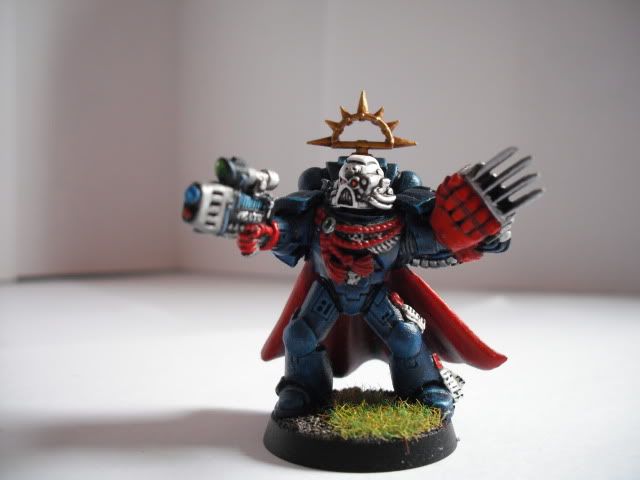 |
| A finished powerfist/lightning claw |
 |
| Painted red cloak |
For the helmet eyes I paint Scab Red and then go over this with Blood Red. Then I give them a wash of Mechrite Red to get shading around the edges. Once this dries i put a spot of Blazing Orange into the eyes to make them stand out.
When doing the red be careful, but don't be worried if the red gets over the blue slightly, take a little regal blue and lightly paint over it. If its along an edge give it an Ice Blue dusting too. Wash with blue wash if needed. Its best to leave this retouching of the blue until the entire model has been painted as i use it to touch up the model at the end.
The Metal
For the metal areas i use boltgun metal for a basecoat, then wash with either Devlan Mud or Badab Black, which ever you prefer. Allow some of the wash to get around the edges of the metal to give a slight black line between metal and surrounding colours. Paint back over the area carefully with Chainmail and then highlight or carefully drybrush with Mithril Silver.
The Gold
If you have any gold areas to paint the start with a basecoat of Tin Bitz. Highlight this with Dwarf Bronze, leaving the Tin Bitz in the recesses. Paint with shining gold and then highlight the raised areas with Burnished Gold. I always find it hard to get gold looking right and often end up washing the area with black or Gryphonne Sepia before applying the gold layers.
The Green
For the leather items, grenades and weapon handles I tend to use green, simply to give a different colour on the model. This starts with a basecoat of Dark Angels Green, followed by Snot Green, being careful to leave the Dark Angels Green visible in recesses. A final highlight of Goblin Green is then applied.
The Flesh
I always have difficulty with flesh, it often seems to end up being too brown on the finished product, sometimes i just need to go over it again to make it look nice. I start with a basecoat of Tallarn Flesh and then wash this with Ogryn Flesh. Paint Dwarf Flesh over much of the face then, leaving the Ogryn Flesh visible in the creases. Then give a highlight of 50/50 Dwarf Flesh/Elf Flesh over the raised areas and then a final highlight of Elf Flesh on stand out raised areas such as the nose and cheeks.
The Beige
For the purity seals and parchments i start with a basecoat of Khemri Brown and then Bleached Bone, leaving the Khemri Brown in the recesses. Even with this i then wash with Gryphonne Sepia and then highlight with a final Bleached Bone layer. The painting of the black writings i usually have problems with. I'm useless at freehand stuff. I'm a painting in the lines painter really!
The Studs
For facestuds follow the metal section above. Start with Boltgun Metal and then give it a wash of Badab Black, ensuring that a thin black ring is visible around the stud. Highlight then with Mithril Silver to make the stud really stand out against the black wash. This method is also used for studs across the armour.
The Base
The base is purely a matter of choice, you may have decided to theme your army around a base. Personally I tend to use a wetbrush of Scorched Brown followed by ligher drybrushes of Bestial Brown, Graveyard Earth, Kommando Khaki and Bleached Bone. I then paint around the edge of the base in black. As I said the base is your own choice.
The Bolter and Other Weapons
Crimson fists have, in general, black weapons with metal areas. For the metal you can follow the description given above. For the black tend to just basecoat black and then edge with shadow grey.
At this stage I varnish the model with one or two light (LIGHT!) coats of satin varnish and then give the model a third light coat of matt varnish to take some of the shine off. Be very careful with the varnish. There is nothing worse than spending a decent amount of time painting only to have it go wrong in this final stage. Don't use varnish in the cold and damp, it dries funny, and don't be tempted to put it on in a thick coat. It will dry like it has cobwebs all over it and this is very hard to correct. One the varnish has dried take out a pot of paint on varnish and put a gloss coat over the helmet eyes and any scopes etc.
Usually, once this is dried I see some tiny part of the model I've forgotten to paint, or some mistake i haven't cleaned up. Just get your brush out, finish off this tiny bit and there you have it, one nice looking Crimson Fist space marine.
The good thing about this method, especially with the blue and the red is that you can do a large number of models in one go and that its a swift and nice looking painting method without worrying about too much highlighting. My Tau army requires alot of edging in the paint job and I wanted to paint an army using a totally different painting style.
The multiple layers of blue and red make for rich colours that really make the models stand out on the battlefield. Its a quick and easy way, even for a novice painter, to paint up multiple models and even vehicles.
Furstenburg
Sample Models
 |
Terminator Sergeant
|
 |
Lysander
|
 |
Rhino
|
 |
Drop pod
|
No comments:
Post a Comment